Showing posts with label BGE. Show all posts

Sunday, September 08, 2024

A Weekend Escape: From Kansas City Adventures to Backyard Grilling Bliss

Here I sit writing about the weekend on a Sunday morning. Last week was a short work week but as is usually the case it seemed like a very long week. It was very busy at work, but it was a productive work week. 

I was glad when Friday arrive as we had plans to travel to Legends in Kansas City to go to Yard House to celebrate Greg's birthday from a few weeks prior. Always a good spot and this time did not disappoint. From the beers and appetizers to diner, everything was delicious. Would you believe I did not get any pictures from the Friday trip? I need to do better at taking pictures to help liven up my weekly posts but that is for another day.

Saturday morning was low key with a trip to Higher Grounds for breakfast, coffee, and a little reading. This was our second visit to Higher Grounds and it continues to be a consistent spot with good food. We discussed while we were there that we want to go back sometime to have lunch. We were able to sit on the patio and the fire was going on the patio as it was a little chilly out Saturday morning here in Topeka.

Following Higher Grounds we went to pick up groceries at Aldi's for the weekend and week. We had plans to grill Saturday night and again on Sunday. We picked up some salmon which along with a salad Carrie was going to make would be our dinner for Saturday night. What a great meal for a beautiful Saturday night.

Meater Cook of Salmon
Salmon Meater Cook
I enjoy using Meater to say when it is time to remove from the grill. Grilling on the Big Green Egg that I have had for a few years I got the Meater a few years ago and I have used it for doing everything from salmon to steaks, turkey, and pork. It works great and would recommend one if you are in the need for a meat thermometer. Works not only on the grill but also in the oven and the newer models will even go into liquids to provide readings. I have the older model, so it can only go up to around 600 degrees and cannot go into anything liquid. Still, it has worked great for me. 

Sunday should be relaxing for us with a lot of NFL games on today which I am looking forward to watching. I have NFL Sunday Ticket through YouTube TV which is my second. year to have and I enjoy the ability to watch any games on Sundays. It helps me to track my fantasy football players and watch them instead of relying on stats to update. It makes it fun to watch them when they are playing and also the ability to switch over to a game if I get a notice they are about to score. I thought about getting NFL RedZone, but decided not to add it this year.

A short meandering Sunday morning post. Now it is time to get ready to watch some football. Have a great day and I will talk with you next week.


Sunday, February 04, 2024

Cooked Beef Stir Fry in the Rain on Saturday Night on Big Green Egg Using a Wok ... Turned Out Great!

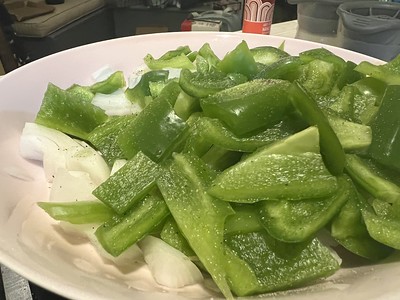
Peppers and Onions Ready for Stir Fry on Big Green Egg
Peppers and Onions Ready

Saturday night was time to do stir fry in the Big Green Egg (BGE). I believe this was the fourth time we have used the wok on the BGE. It had been raining most of the day, but that did not stop me from firing of the BGE and getting the wok ready. It did take a while to the fire going with the rain. I was finally able to close the lid to the BGE and leave the top open which helped and got the temperature up to around 400 degrees. I wanted the temperature to be between 450 and 500 but with the rain during preparation and then when I was finally cooking the stir fry, the temperature was consistently around 400 degrees.

Marinated Beef Ready for Big Green Egg
Marinated Beef Ready for Wok
The beef was done in a sauce that Carrie had put together. Some spice, soy, and a little more spice. The beef smelled so good as it marinated and I got the BGE ready. With how long it took to get the BGE going in the rain, the beef marinated for about 45 - 60 minutes. Carrie knows that I like to have a lot of sauce, so it was nice a saucy ready for the wok. No, you cannot tell from the picture to the right that it is saucy, but it was very nice and smelled so good.

We had the veggies and meat ready to go and the fire was right. I put the wok on the BGE to let it warm up for about five minutes. The temperature was still right around 400 degrees. Added some oil and then the meat. Immediately started sizzling and a lot of smoke with the coldness outside. Carrie came out to help me and held an umbrella over us while I cooked. I cooked the meet for about five minutes and then spread it out to the edges of the wok. Now it was time to add in the veggies that I put right in the middle. Still a lot of liquid from the sauce, but it worked out great as the veggies kind of boiled in the liquid. 

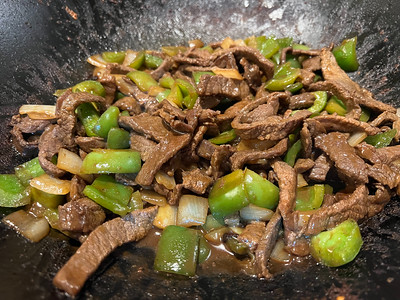
Finished Beef Stir Fry in Wok from Big Green Egg
Finished Stir Fry from BGE
I cooked the veggies in the middle of the meat for three or four minutes. It was then time to mix everything together and continue starring in the meat to the veggies. For another minutes or two and then it was time for more sauce. We used a packet for the stir fry sauce that needed to thicken up a little after it was added. After about two minutes, I could see the sauce had thickened and it was time to take it inside. 

Another success as it was delicious! Carrie did some rice in our rice cooker and we have enough for leftovers for us both tomorrow for lunch. We had some kimchi in our fridge that went along great with the stir fry. 

Following dinner, I went out to put the BGE back together and prepare it for the night. I noticed that it had cooled down very quickly with the chill in the air and rain. Normally, it takes a few hours for the grill to cool off, but tonight it had cooled down quickly.

Another successful night of grilling with the BGE using a wok. We loved it and I cannot wait to cook again with the wok. Our plan is to do multiple wok cooks this summer so we can have leftovers of various options through the week. Rice works great, but we also want to try doing noddles with with one of these cooks.

Have a great week and I will talk to you next week for Super Bowl Sunday.


Sunday, August 27, 2023

Spare Ribs on the Big Green Egg with Recipe and Pictures from My Experience

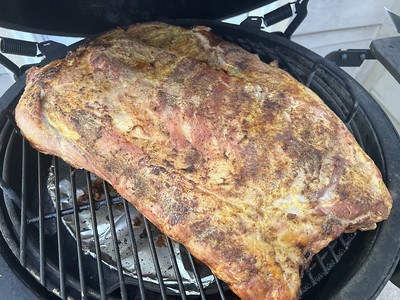
Spare Ribs Prepped and Ready to go on the Grill
Spare Ribs Prepped and Ready

To continue what I was cooking last weekend (see last weeks post), I did spare ribs on Sunday. My first time doing spare ribs and probably my fifth or sixth time trying ribs in general. The past attempts had provided tough, dry, and dry ribs. I was not sure how this would go, but I used a recipe I found on Big Green Egg Forum and combined with another recipe I found on The BBQ Buddha

I started out planning to do the recipe from the forum which is referred to on the forum as Micky's Turbo Ribs. This recipe consists of the following:

  • 350 indirect for 1hr 40 min. 
  • Before cooking: Pull membrane, mustard, and add rub. 
  • Put on at 350 and leave the alone for about that time. 

Although as I was getting started, I found another recipe that I thought would work better for the large slabs of meat I had to cook for the day.

I completely changed over to using The BBQ Buddha recipe which calls for grill to be at 350 degrees on indirect cooking. Preheated the BGE to 350 degrees while I prepared the meat, rub, and the spritz.

  1. Trim fat, pull membrane, remove flap meat, and prepare for mustard and rub.
  2. Slather with mustard as a binder for the rub.
  3. The rub consists of salt, pepper, and paprika
  4. Leave the ribs untouched on the BGE for one hour without opening the lid. After one hour, start spritzing. Springs consists of the following.
    • 1 cup of apple juice
    • 1/2 cup of apple cider vinegar
    • A few dashes of hot sauce
    • A few dashes of Worcestershire sauce
  5. Begin spritzing with the spray every 30 minutes until done.
  6. I set a timer and checked the ribs every 30 minutes spraying with the above spritz.
  7. At the 3 hour mark, I checked to see if I could see the bones sticking out or how the meat would bend when I picked up with the tongs. Good indication the meat is done. I did leave on for another 30 - 40 minutes continuing the spritz.
  8. Pull the ribs when they are done. Let rest before cutting them up. I applied BBQ sauce after I cut them up and while I ate the ribs.
Ribs After One Hour Cooking Untouched
Ribs After One Hour

While I had planned to do Micky's Turbo Ribs when I started, I think changing over to the The BBQ Buddha worked out well for me. I do not think the large spare rib racks would have cooked as needed with Micky's Turbo Ribs recipe, so I am glad I changed over to the other recipe just as I was starting to prep. It was a game time decision to change over to the other recipe.

The spare ribs were so large that they did not really fit on the grill. You might not be able to tell, but the ribs are laying on top of one another in the picture to the left. Meat hanging off of the edge of the grill on all four corners, but it seemed to work. After an hour I was spritzing the meat lifting the top layer and getting moisture to the second rack. 

Spare Ribs After About 90 minutes of cooking split up to two layers
Spare Ribs Split Up to Levels

After about 90 minutes of cooking, I was able to add a second level and put each rack of ribs on their own level. I thought this would help to evenly cook both racks of meat. The rack that was on the bottom the first 90 minutes of cooking, I put on the top rack. After the first hour, i was spritzing as I mentioned and then after 90 minutes, I split up the two racks and continued the spritz on both racks.

After about two hours, I started checking the ribs by picking them up with the tongs to see how they felt. Continued the spritz, but kept them on for another hour and half or so going by touch of how they looked and felt with the tongs.

Ribs Are Done and Ready to Cut Up and Eat
Ribs are Done!

Pulled them when I could see bend in the ribs and bones were exposed. Let them rest for 15 - 20 minutes before I started to cut them up. Sampled some of the meat as I cut them up and tasted good. I realized after the fact I did not take any pictures of the cut up meat, but that will be for next time when I try this again.

The meat tasted good. Depending on the meat, I had some that the meat fell off of the bone and others that were a little tough. I think this could have to do with whether it was the meat on the top or bottom to start the cook. I did have someone recommend in the r/biggreenegg post I did about my cook that they recommend using skewer to fit more on to the grill. Of course others recommended using racks to fit more on to the grill, but others, including The BBQ Buddha, do not like to use racks. I certainly had an issue where the meat was too large to fit on the grill for two of them. It created a lot of food to eat, but it was a little difficult to work with the meat on the grill. I think I will try the skewer the next time I try ribs.

I had a fun time throughout the weekend doing different cooks. I really enjoyed the wings that I did and had those for leftovers for days. I want to do wings again and I plan to do ribs again too with some of the adjustments I listed above for the next time I do ribs. I had a fun time doing all of my cooks while Carrie was out of town and now to do some cooking while she is back home and can help me to enjoy what I cook.

Until next time, have a great week and I will talk to you next week.


Sunday, July 30, 2023

Made Our First Pizza and Cooked on the Big Green Egg... It was a success!

Pizza on the Big Green Egg -- First Time
Pizza on Big Green Egg

I have been wanting to do homemade pizza on the Big Green Egg for a few years. We finally did our first pizza tonight and it turned out nicely. Carrie and I were nervous about doing our own pizza, but it was easy. The crust turned out well with some crunch and we both think we could have topped it with more cheese than what we did. The crust is store bought dough that we bought at Dillon's. We worked it out to fit a pizza pan and then added our toppings. Toppings included pizza sauce, turkey pepperoni, mushrooms, and cheese.

The grill was set for indirect with the grill insert to raise the pie high in the dome. I got to a temp of 450 degrees and kept it there throughout. It only took about ten minutes to cook. Halfway through and I could smell the pizza cooking. I was able to look in through the vent and I could see the cheese melting. What a good sight!

Finished Pizza from the Big Green Egg
Finished Pizza from Big Green Egg

The taste was good although we have some things to change. One video I watched while preparing for our first time making our own pizza said that pizza making is a evolving process where we will learn new techniques and try new processes. The crust was good and a little crunchy. It was a little salty which could have been from the sauce, mushrooms, or possibly the crust. Even with the salty taste, it was a good first attempt. We have leftovers we can eat tomorrow for lunch.

Now that we have done our first pizza on the Big Green Egg, I am excited to try different toppings and processes. We will use the dough again for a future cook although Carrie thinks we could get two crusts out of the dough which we might try the next time. 

Until next time, have a great week...


Saturday, July 22, 2023

Poor Mans Burnt Ends with Chuck Roast on Big Green Egg

Grill Ready to Cook Poor Mans Burnt Ends
Grill Ready for Cooking

I found a recipe a while back for Poor Mans Burnt Ends, so I decided to give it a try last weekend. I ordered the rub and BBQ sauce from the Pitboss Grills web site as it sounded pretty good. I had read through a few other poor mans burnt ends recipes and this one sounded the best. We got a little over 3 lb chuck roast. I was excited and got the grill going mid-morning. The recipe said it would take eight hours, but that was on a smoker they were using so it was not going to take as long for my cook.

Followed the recipe to a tee doing the rub all over the chuck roast to start. I set the BGE up for 275 and it stuck on that target temp throughout the cook. The whole cooking process took about four hours.

Chuck Roast Half-way Through a Four Hour Cook
Chuck Roast Half-way Through Cook

After putting the chuck roast on the grill, I let it sit untouched for a little over two hours when the target temp finally hit 165 degrees. It smelled so good as it was cooking as I could smell the rub that was being cooked and smoking as it went along.

We had a rain storm just as it was supposed to be hitting the target temp which did cause the grill temp to drop a little as I was away from the grill and could not adjust the vents appropriately, but it quickly regained the target temp and finished out to remove the chuck roast from the grill.

Chuck Roast After Two Hours and Thirty Minutes of Cooking
After 2 hours and 30 minutes

After two hours and thirty minutes, I removed the chuck roast from the grill.  I wrapped it in aluminum foil and placed it back on the grill for another hour to reach a target of 195 degrees. Again, it smelled heavily as it finished up the last part of the cooking. 

Once the target temp of 195 degrees was hit, I removed from the grill again and let it sit for 15 - 20 minutes before cutting it up into cubes. Placing the cut up cubes into an aluminum foil pan where the meat was covered in brown sugar and the BBQ sauce. The whole tray was placed back on the grill at 275 where it sat for another hour.

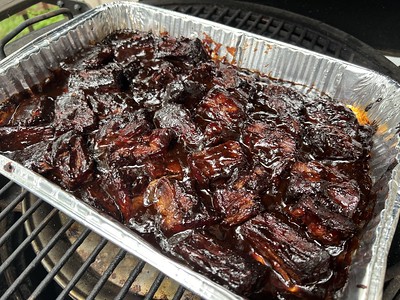
Cut up meat covered in brown sugar and BBQ sauce
Partway through final stage

The goal was to cook the cubes meat in the brown sugar and BBQ sauce until the BBQ sauce became thick from being cooked. This did take a little over an hour to occur. When I opened the grill, which was still set at 275, to check the meet after an hour the BBQ sauce was bubbling as it cooked the meat. The meat was tender to the touch and had a nice color as it finished up on the grill.

As I removed the meat from the grill and brought it inside, it was all Carrie and I could do to not sample it hot off of the grill. So, we let it sit for a few minutes, maybe 15 minutes, and then sampled one piece. Tender and tasted good. We decided we were not big fans of the BBQ sauce but then when we had leftovers the next day, it tasted much better. Next time we do this cook, we will use a KC BBQ sauce.

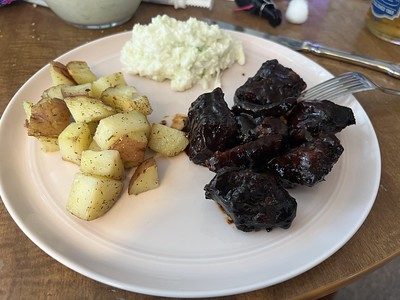
Dinner is Served
Dinner is Served

Carrie made roasted potatoes and then Brookville Hotel Sweet and Sour Coleslaw which went along really well with the dinner. The meat was prefect and we had leftovers to last us for two or three more meals. 

Overall, I liked the process. As I mentioned, I would change out the BBQ sauce and also the rub would be different. The meat turned out really well and I would do the whole process again. The nice thing is that I could fit probably three chuck roasts on the grill if I needed to make a lot for an event.

Until next time, have a great weekend and a wonderful week...


Sunday, April 02, 2023

Grilled Pork Tenderloin and Asparagus on Big Green Egg Last Sunday… It Was So Good!

Preparing Big Green Egg for Some Cooking

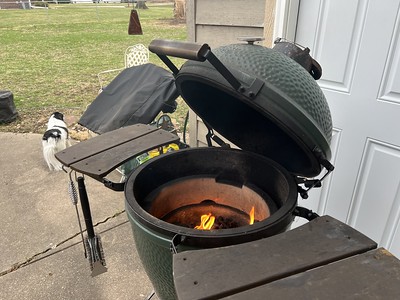
Decided to do some grilling last Sunday, March 26. It had been a while since I had grilled. Oliver was helping me get everything ready by being the lookout for the back yard as I got the grill ready. As soon as I come through the family room with the bag to do the fire, he leaps off of the couch and is ready to go outside with me. It was a bit chilly on Sunday, but we did not mind, and every time I went in, or out, of the house, Oliver was right there to help.

Carrie had picked up a pork tenderloin at the store, so we did some seasoning so we could marinate the two pork tenderloins in a plastic bag for a few hours before grilling. Prepped some asparagus to go on the grill too. I realized as I am writing that I neglected to get a picture of everything done plated. I always miss out on doing the final picture as excited to get to eating. Oliver and I had a grand time grilling. He patrolled the people walking and made sure I was doing everything properly. Carrie had bought some IPA beers for me when we were in St. Louis, so I was enjoying those while I grilled. It was so good! I want to grill more!

Pork Tenderloin and Asparagus on the Grill

It had also been a while since I had used the Meater Block, so this was a chance to use those for this cook. Carrie likes pork a little more done, so I set both for a little longer on the grill. Once again, Meater did great and the pork was nice and juicy. The asparagus on the grill turned out really good too. A little crunch, but really good flavor. A little oil, salt and pepper, and right on the grill made for a delicious compliment with the pork tenderloin.

The meal was so good, we are planning to grill again today. Getting ready to head to the store to pick up groceries and we plan to get the pork marinating earlier this time. I will try to capture how we do the marinade so I can include that for next weeks update. I also plan to include a picture of the completed meal before I start chowing down. 

Oliver Sleey After Helping with Cooking

Oliver was so sleepy after helping with the cooking, he fell asleep shortly after we finished with dinner. His tongue out and sacked out while we cleaned up and watched television. Poor little guy worked so hard making sure I was doing everything correctly outside, he slept most of the night as we hung out in the family room. I am sure Oliver will hep today when I cook too and good thing I have a full bag of lump for the grill ready to go.

Hoping this weather sticks around as it is so great outside. The grass is greening up and will start to grow soon. I noticed my first mosquito yesterday afternoon while sitting outside on our patio. Good thing we have Mosquito Joe coming this week to start treatment on our yard. If you have not tried Mosquito Joe, I recommend you do so. When we were not using Mosquito Joe to treat our lawn, I could barely go in our back yard without getting eaten up. We have been using Mosquito Joe for three or four years now. 

I hope you have a great day and be sure to cheer on the Royals today at 1 pm. We need a win badly and also need run support. We are 0 - 2 to start the season and have a total of zero runs in those two games. It has been a rough start, but as they say, there are a lot of games to play.

Have a great week!


Sunday, May 29, 2022

Cooked Salmon on BGE Using Meater Thermometer to Measure Doneness and When to Remove from the Grill

A few weeks ago while browsing social media, I had an display for me about a new meat thermometer called Meater. One of those ads where I saw it a few times, looked interesting, and then started seeing it on YouTube, FaceBook, etc. as I was browsing other sites as it was detected I was interested in the product. I eventually ended up buying Meater as it looked really cool!
 
I have now used Meater twice and love it! I have a meat thermometer that I have had for a few years which I use frequently for cooking larger cooks such as turkey, chicken, etc., but my old thermometer uses wires. Meater is wireless and has an option to connect to a block that extends wirelss to be able to use all over the house and still keep track of a cook.
 
I first used Meater to cook steaks. Straight forward enough but I was excited to use Meater, so I used it with two t-bones we purchased. They turned out great! I likely would have left the meat on past when Meater told me to remove them from heat. The steaks were cooked perfectly and Meater even allows for post cooking time as the meat continues to cook.
 
Salmon Filets Ready for the GrillOn Sunday, May 22 I used Meater to cook salmon filets. Prepared them straight forward enough with salt, pepper, and some seasoning we had in the cabinet. Inserted the two Meater probes and got the grill ready for cooking. I did the salmon on wood planks we have had for a few years but never used. Set temp for 400 degrees and let it do its thing. All told, it took about 26 minutes for the full cook and food to be ready to eat. Turned out great!
 
Salmon on BGE Cooking with Meater Monitoring the TempsThe Meater monitors wirelessly which is nice so I can be anywhere in the house and see the temps, alerts, or status of the cook. The picture to the right shows the salmon on the grill with the Meater monitoring the cook. The Meater works not only on charcoal grills, but also on gas, oven, or even air friers. We have only used it so far on the grill. Very happy with the new purchase and the results have been fantastic in terms of the meat being cooked to perfect.
 
A nice cold bevarage was sipped while the salmon cooked. Having the range of being able to be in another room and know how the meat is cooking is amazing. The Meater monitors not only the internal temperature of the meat but the ambient temp surrouding the meat too which means it can monitor and tell you when to remove the meat from the grill as well as when the meat is ready to eat as it monitors the meat that continues to cook as it is removed from the heat. Again, I have been impressed so far with my use of the Meater.
 
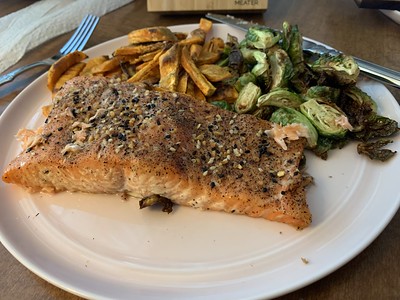
Finished Product on the PlateThe finished product turned out nicely. Flaky salmon and not overdone at all. Unlike past grilling sessions where I have tried to cook salmon, this turned out done but almost buttery because of the temp of the fish. Both Carrie and I were pleased with the result and I cannot wait to try again with a different cut of meat. I plan to do swordfish at some point and look forward to doing larger items using the Meater to see how those turn out.
 
Willcott Brewing Company from Holton, KSOn Saturday, we ran errands to various places and one stop was in Holton, Kansas where we visited Willcott Brewing Company. If you have a chance, I recommend stopping by Holton, KS to visit Willcott Brewing Company. I had a wheat and IPA while I was there and ended up taking home a growler of their beer which is what I was drinking on Sunday when I did the salmon. Great weekend!
 
Until next time, have a great rest of your weekend and I hope to start posting again about my cooks using Meater and drinking some of my favorite beers.
 

Sunday, December 05, 2021

Follow up on Thanksgiving Day Turkey Breast Cooking Plus Oliver Not Feeling Great During the Holiday

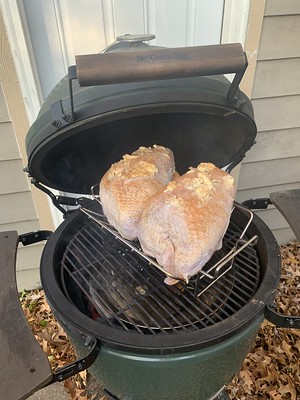
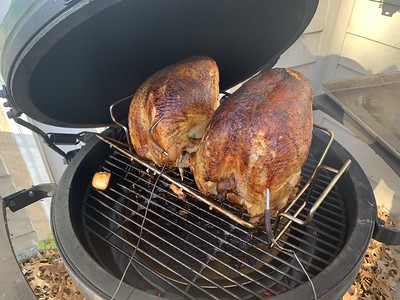
Turkey Breasts Prepped and on the Grill

For Thanksgiving this year, we did turkey breasts on the grill. We decided not to do fully turkey, but only the breasts. We did salt, pepper, some other seasoning, and then butter over the top. We were debating on whether to put them breast up or down. We thought we had them breast up as we thought they would cook better that way, but then after I posted the picture to the left on Twitter, a friend commented how they were breast down. Possibly thinking they were whole turkeys, but I am sure they were breast up. 

I cooked them on indirect heat using the convEGGtor at 325 degrees sitting on a rack. The turkey breasts were around 7 lbs, so we figured it would be about two hours to cook. Got the rest of it set up and going without too much trouble and let them sit in the BGE cooking away while we got ready for the day.

Turkey Breasts Done on BGE for Thanksgiving 2021

After a little over two hours, they were looking really good. I rotated them a few times to get even cook throughout. Using thermometer that I monitor remotely with my Apple Watch and iPhone, I was able to watch their progression to completion while watching parades and getting ready for the day. I have to say, these two turkey breasts probably turned out the best I have ever done in terms of appearance for how they look. Nice golden brown overall which I have not had happen with previous turkey cooks regardless of whether they were whole turkeys or just the turkey breasts. I believe this is the second year in a row where we did turkey breasts and these turned out really good in appearance.

Finished Turkey Breast Preparing for Carving
I did have some issues having them cook evenly which is why I was rotating them to move the one in front to the back and then later reversed. The internal temp was high for one bird or in one part, but not to the target temp of 165 in another portion. So, I probably left them on a bit long which meant they were a little dry, but that is what gravy is for to help with dryness. 

We have one turkey breast remaining which we will do one weekend as a treat. It is back in the freezer waiting for the next time we cook and do some favorites of Thanksgiving Day food.

Little Oliver Helping me with Thanksgiving Day Cooking on the BGE
I did have my little dog, Oliver, out helping me with the cooking. He was not feeling well the days leading up to Thanksgiving and then he got a little worse going into the weekend from that Thursday. In fact, we were planning to take him to the vet first thing Monday morning to have him checked over. In the picture to the right, this is Oliver enjoying the sun, but you can see he is not feeling the best. I think on Thanksgiving Day he was not eating and not a lot of energy.

As we went into Saturday and Sunday, he went over 24 hours without eating anything. We had tried doing this to him the Tuesday or Wednesday of that week, but he did this on his own. It helped and by Saturday/Sunday he was back to himself. He was eating, running around the house, and not having any issues. We were so happy to have our Oliver back to "normal". We decided we would play it by ear for the vet Monday morning and he was doing great, so we did not take him into see the vet. He has been good ever since which we are grateful happened.

Overall, we had a fantastic Thanksgiving. The weather was beautiful, ate a lot of wonderful food, and we had a good day talking with family. Plus there was sports, so that was fun too!


Sunday, November 29, 2020

Thanksgiving Turkey with Pictures and my Experience

This was posted on the Big Green Egg Forum too at https://eggheadforum.com/discussion/1226480/thanksgiving-turkey-with-pictures-and-my-experience.

Had a fun two days preparing for Thanksgiving. Nothing special, but did a turkey back-to-back days. I used the same process on both. A pecan seasoning we got from our local BGE store a year ago which is really good. We used it all up and I forgot to get the exact name, but I know our local store carries it, so I will go back to get some more.

Both turkeys were about 12 lbs. I did the first one on Wednesday after I got home from work. Sprinkled the pecan seasoning all over the turkey. Stuffed it with celery, carrots, and apples. Pretty simple, but it worked out well. I put it on the BGE with a raised rack. Cooked about 2.5 to 3 hours. It turned out good, but a little black on the top. No pictures from this one cook, but the meat tasted good. Nice and moist but a little black on the top.

For the second cook, yesterday, I did not use the raised grill and kept the bird down a lower. Again, this was another about 12 lb turkey and cooked it for 2.5 to 3 hours. Lower gave it a nice color on the outside. Used the same seasoning and stuffed it with everything we did the day before except for apples.... we ran out.

Pre-picture before going on the grill. Had it in a pan to catch drippings for gravy. Some onions, celery, and chicken broth in the pan. Did this for the turkey the day before too although did not keep it filled throughout the entire cook. Started it off to give a little moisture and basically to catch drippings.


Had to get a picture of my dog helping me with the lookout. He wears himself out going in and out of the house with me anytime I grill. He gets very excited each time I grab the lump to take out and start getting ready.


While it was cooking, did not open the lid at all. Let it cook and trusted the process as I have seen on here many times. Target temp was 325 which it went to immediately for this cook. In the cook the day before, I had a difficult time getting the temp up to 325. Odd how some days I go to cook and it is easy to get high temp and other days it is difficult.


I think it came off looking really good. Better than the one the day before. It had one of those temperature pop-out sticks in it. My wife pulled it before I snapped the picture. I was pleased with how it looked as a final product.

A final picture of everything on the table. Made a lot of turkey this year as we were giving it out to my family as we were social distancing and sharing food with one another. We made the turkey, mashed potatoes, and gravy for us and shared it with everyone else too making plates for them and delivered on my in-laws driveway about 3:30 during the day. Ham was done by my brother-in-law and then two different kinds of dressing. I forgot we also did giblets and neck in the gravy which we had not done in a long time... it was so good!


Following dinner, we played Yahtzee and I probably had way too much to drink. It was a good day even though completely different from any other Thanksgiving, it was the first Thanksgiving that my wife and I had together with just the two of us since we were married which in a way made it special.

I wanted to share as I had not done pictures of previous turkey dinners I had cooked. Last year was the firs time I had ever done a turkey on the BGE and it turned out great, but did not take pictures or document it at all. I wanted to get this one recorded so I could reference back next year to what we did.